Best Of
Re: Is there a way to conditionally copy the value of one cell to another?
Hi @Jim Kiltie
I would add the Row ID auto number column and the Parent Row ID helper columns for this solution.😀
How to fix your formula
Then, the LastNum formula becomes like this;
="0" + MATCH([Row ID]@row, COLLECT([Row ID]:[Row ID], [Parent ID]:[Parent ID], [Parent ID]@row), 0)
You want to use the zero padding numbering system like 01, 02, 03 instead of 1,2,3. In that case, it would be easier to do the padding here.
Then, the IDNum formula becomes like this.
=JOIN(ANCESTORS([Last Num]@row), "-") + IF(COUNT(ANCESTORS()) > 0, "-", "") + [Last Num]@row
Using ANCESTORS, you can cope with more than three level cases, like Parent, Child, and Grandchild.
Using IF(COUNT(ANCESTORS()) > 0, "-", "") removes the unnecessary delimiter at the top row.
You could use delimeter# instead of "-" if you use the Sheet Summary fields. (See at the bottom.)
More standard ways for auto-numbering
Please find more standard ways for auto-numbering on the right-hand side of the published demo sheet.
The difference between the fixed and dynamic is if you move the rows in a children group, the fixed one keeps the same Last Num or Self in my demo. In contrast, the dynamic one changes the Last Num depending on the relative position of the row in the same children group.
The formula for the "Self Dynamic" column is the same as for "LastNum." The "Self Fixed" uses the RANKEQ function instead of the MATCH function to get the absolute position of the row among the same children group.


You can specify the Prefix and delimiter in the Sheet Summary and call in the sheet cell formula as [filed name]#, delimiter#, for example.
By using the Sheet Summary, you can change those values dynamically.

Re: Formula Help Needed: To populate unlimited level of children row with Parent data
@Vivien Chong, if you've still got the level column then yes, we can amend the formula slightly to get round this.
If you call your "testing 1" type task level 0, then:
=IF(Level@row <= 1, [Ep Number]@row, PARENT([Ep No]@row))
Sample:

Obviously if your level number system is slightly different then you will need to amend the number in the formula but hopefully this gives you the gist of what to do - let me know if there are any other issues. 🙂
 Nick Korna
Re: Two cells, one is $$
I would suggest creating a row report pulling from the sheet that is grouped by service type then use the summary feature within the report to get your totals which can then be used for your chart.
Saves from having to use formulas and separate sheets and whatnot.
 Paul Newcome
Re: Simple Addition
Hi,
Try using =SUM and the rows.
Also you might want to download the formula handbook it is a huge help. You can find examples of using SUM and the link to the handbook in this article : https://help.smartsheet.com/function/sum
Marlana
 Marlana K.
Re: Formula to split text into columns
@MichelleBohn Looks like @Kelly Moore beat me to it :) :)
I have access to the SS early adopter Generative AI so I thought I'd test this request using the following wording: Extract the text between the second and third \
Worked flawlessly but it doesn't show you the formula, which would be nice to have but I guess that is the way it's going, similar to functions in Excel that do the work for you. However, I like puzzles like these formulas.
Thank you, Kelly!
KarinR
Re: I need Help - Trying to do a VLOOKUP Partial Match
@Paul Newcome I am getting an incorrect argument set error. If I'm understanding it right, the first data reference is the column I'm pulling from which is the column that 'cars test' is in. The second data point is the column in my raw data spreadsheet, then contains is referencing the exact row that says 'cars test'.
 JPSmartSheet
Re: Possible to automate numbers per row type?
I think you might be able to leverage an Auto-Number column (which would be hidden) that would work with a formula column to produce your result.
So, for example, you have an Auto-Number column, and it just consecutively numbers every row, regardless of transaction type, using whatever set-up you prefer. But, that column stays hidden. (It's shown in the screen cap below for reference, but it does not need to be visible.)
You create a PO Request column using a checklist column type and insert the following column-level formula:
=IF(OR([Payment Type]@row = "Payment Type A", [Payment Type]@row = "Payment Type B", [Payment Type]@row = "Payment Type C"), 1, 0)
("Payment Type A," "Payment Type B," and "Payment Type C" are just placeholders for the payment types that you DO want to produce a PO number - you may have more or less than 3 types - edit as needed.)
Then, in your PO Number column (which WILL be visible), create the following column-level formula:
=IF([PO Request]@row = 1, [Auto Number]@row, "n/a")
(NOTE: you can also just leave the rows that don't need a PO Number blank by replacing "n/a" with "" in your formula.)

Note that the one disadvantage here is that your PO Numbers will have gaps because some will not be used.
Hope this is helpful! Please feel free to tag me in a follow-up post if not, and I'm glad to help. ☺️
 Danielle Arteaga
Re: IF formula to check the box column
So glad to hear it worked for you!
Yes, as long as the cells don't have "Accepted" as the only word, you can have other columns between your ranges as well.
 Genevieve P.
Re: Filter Help
It appears that you're attempting to house a table within the sheet (different columns for different groups of rows). I do not believe that you will be able to accomplish that. If you adjust your data to not have "stacked" tables within the sheet, you will be able to filter using @Jeremy C 's instructions.
 adp_cl
Re: why when I remove a person at a sheet level is their permissions removed from the workspace level?
It sounds like you were an Admin of the Workspace and your colleague was the Owner, is that correct?
An Admin can make themselves the workspace owner by removing the current workspace owner. This is the only way to change ownership of a workspace. (See Transfer Ownership of a Workspace).
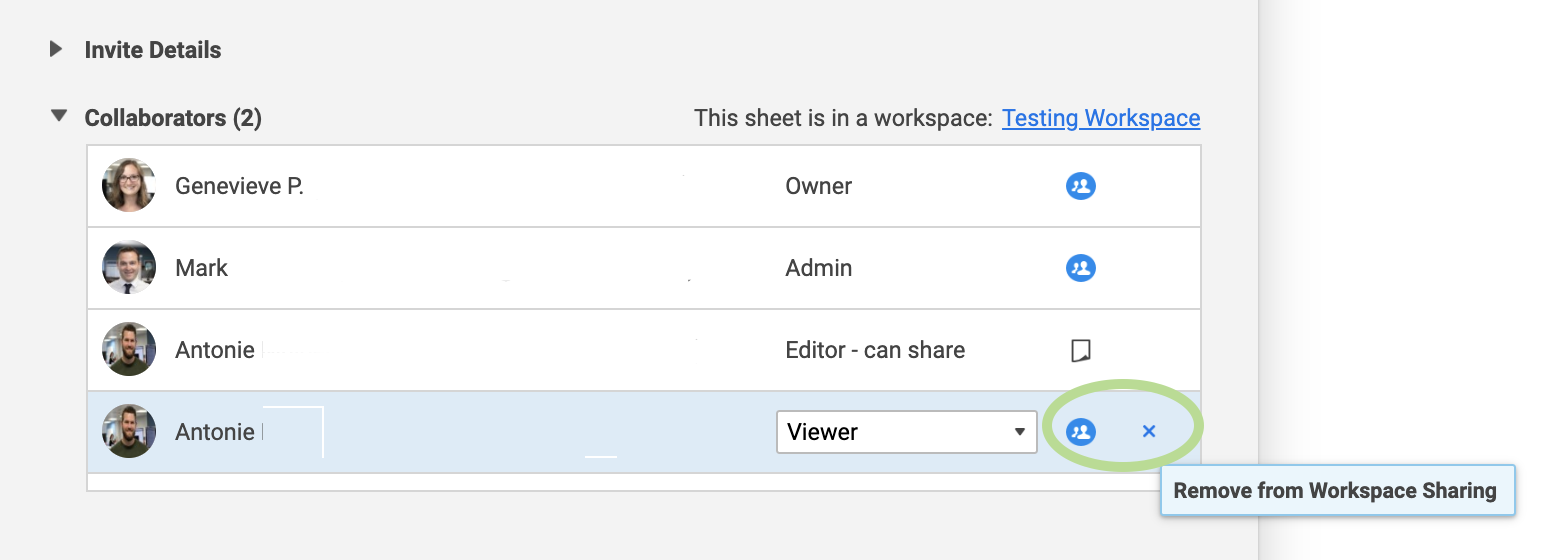
When you're looking at a user shared to a sheet, if the sheet is in a workspace and the sharing window is showing you their workspace sharing permissions, you'll see a different icon next to their name:

In this instance, Mark is shared to the Workspace level as Admin (indicated by the blue Workspace icon). On the other hand, Antonie is shared just to the Sheet.
When you hover over the "x" that appears next to their name, a helper box will pop up letting you know if you'll be removing that person from the Workspace or just the sheet.
Keep in mind that you can share one person at both the workspace level and at a sheet level. For example, maybe I wanted to give Antonie Viewer permissions of the entire workspace, but on this one specific sheet I want him to have Editor permissions. In this case I would share him twice, and he would appear in the Sharing window twice.
Let me know if I can help clarify anything further!
Cheers,
Genevieve
Genevieve P.